


Endura 5500 PVD Maintenance And Chamber Consumable Pain Points
Apr 30, 2026
Leave a message
|
System Module |
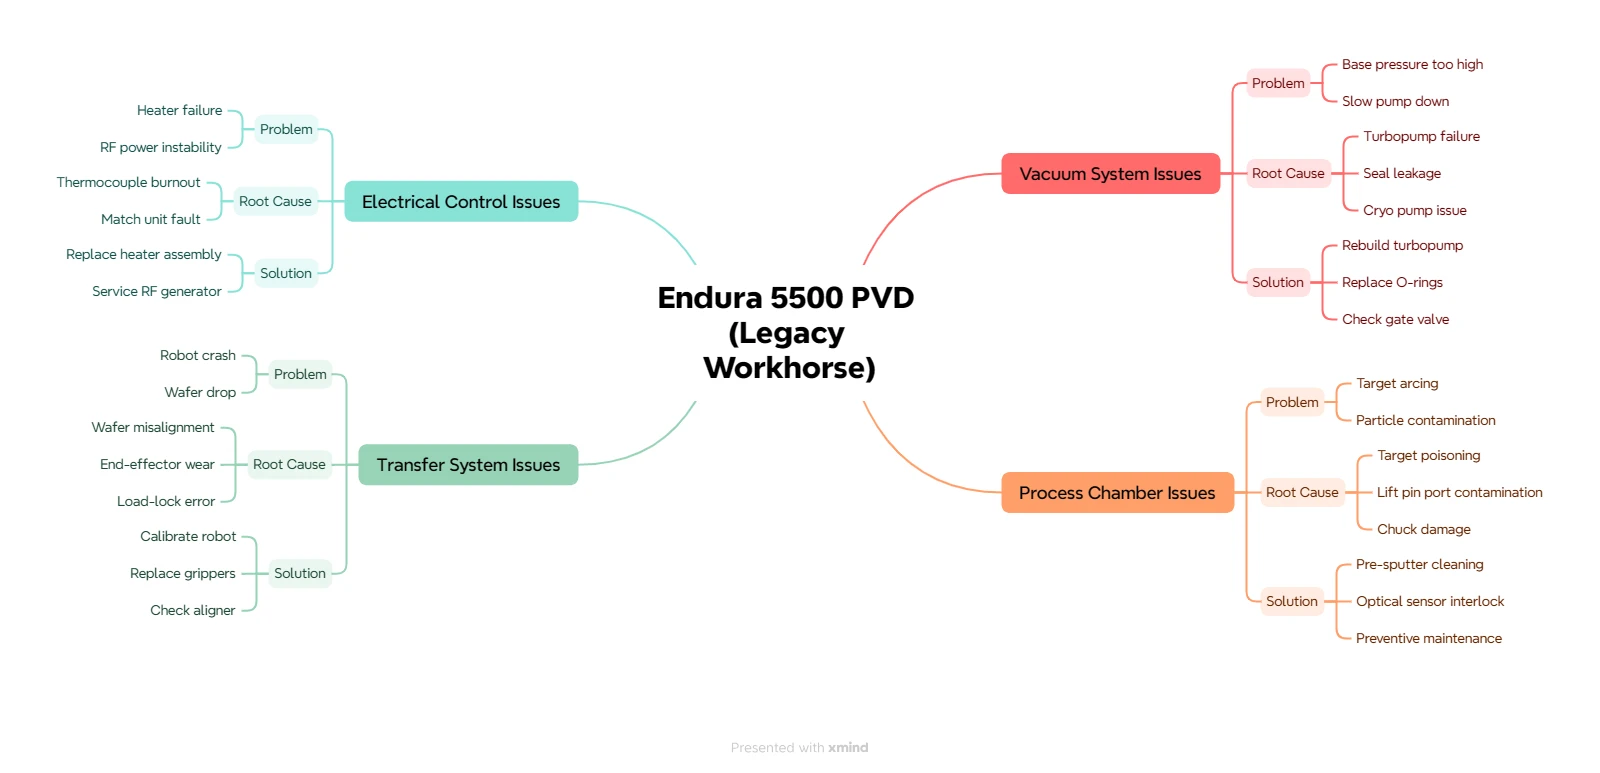
Endura 5500 PVD Pain Points |
|---|---|
|
Vacuum System |
Fails to achieve base pressure (turbo molecular pump wear), slow Load Lock pump-down speed |
|
Process Chamber |
Particle contamination from target arcing/nodulation, ESC (Electrostatic Chuck) aging |
|
Transfer System |
Robot homing inaccuracy, belt slippage, pre-aligner failure |
|
Electrical Control |
Frequent RF Match tuning, failure of legacy I/O boards |
I. Vacuum System: Fails to Achieve Base Pressure, Slow Load Lock Pump-Down
|
Pain Point |
Root Cause Analysis and Solutions |
|---|---|
|
Turbo Molecular Pump Wear / Fails to Achieve Base Pressure |
Analysis & Solution: The turbo molecular pump is core for achieving high vacuum. Its wear (typically bearing damage or rotor imbalance) leads to reduced rotational speed, resulting in inability to reach ultimate vacuum or significantly reduced pumping speed. 1. Shutdown Check: First, check if the cooling water flow for the turbo pump is normal, and check for abnormal vibration or noise. 2. Leak Detection & Troubleshooting: Use a helium mass spectrometer leak detector to check the entire system for leaks, ruling out insufficient pumping speed of the roughing pump or pipeline leaks. 3. Professional Overhaul: If internal pump wear is confirmed, it must be sent to a professional organization for bearing replacement, dynamic balance correction, or complete refurbishment. (Schematic representation): [Vacuum Chamber] --(Rough Pumping)--> [Turbo Molecular Pump] --(High Vacuum)--> [Process Chamber] (Note: A ⚠️ symbol on the turbo pump icon indicates wear requiring repair). |
|
Slow Load Lock Pump-Down |
Analysis & Solution: Slow Load Lock pump-down is usually not due to pump failure, but rather pipeline resistance or foreline condition issues. 1. Replace Seals: Periodically (e.g., annually) replace all O-rings within the Load Lock chamber to prevent aging and air leakage. 2. Check Valves: Inspect the gate valve connecting to the Load Lock for being partially open, foreign objects on the valve seat, or insufficient actuator air pressure. 3. Foreline Pump Maintenance: Check the dry pump's filter for clogging and replace it if necessary. |
II. Process Chamber: Particle Contamination from Target Arcing/Nodulation, ESC (Electrostatic Chuck) Aging
|
Pain Point |
Root Cause Analysis and Solutions |
|---|---|
|
Particle Contamination from Target Arcing/Nodulation |
Analysis & Solution: Target arcing/nodulation (Arcing/Spitting) is a critical defect in PVD, typically caused by uneven magnetic fields, insufficient target purity, or local overheating. 1. Process Optimization: Adjust sputtering power and gas pressure, use stepped ignition or dynamic magnetic field scanning to reduce arc spot dwell time on the target surface. 2. Regular Cleaning: Before target removal, carefully remove nodules from the target surface using specialized tools or chemical methods to restore flatness. 3. Target Upgrade: Use ultra-high purity targets with higher density (e.g., ≥99.95%) and lower impurity levels to reduce abnormal discharge. (Schematic representation): [Target] --(Sputtering)--> [Plasma] (Note: A protrusion ⚡ on the target surface represents a nodule; a black dot on the corresponding position of the wafer below represents a particle). |
|
ESC Aging |
Analysis & Solution: ESC aging leads to insufficient clamping force and temperature non-uniformity, directly affecting wafer warpage and film thickness uniformity. 1. Disassembly & Inspection: Check if internal cooling water channels are blocked and if seals are aged/leaking. 2. Electrode/Dielectric Layer Refurbishment: If the aluminum nitride (AlN) ceramic coating is cracked or the polyimide film is damaged, professional refurbishment is required. 3. System Calibration: After repair, the electrostatic clamping controller must be recalibrated to ensure stable high-voltage output. |
III. Transfer System: Robot Homing Inaccuracy, Belt Slippage, Pre-aligner Failure
|
Pain Point |
Root Cause Analysis and Solutions |
|---|---|
|
Robot Homing Inaccuracy / Belt Slippage |
Analysis & Solution: This is a typical mechanical transmission and calibration issue. 1. Belt Maintenance: Check the belt for stretching or wear, and perform tension adjustment or replacement if necessary. 2. Servo System Reset: Perform the robot's Servo On/Off reset procedure, and check if the servo motor encoder is dirty. 3. Recalibration: In the equipment maintenance menu, re-execute the robot's homing (Home) and position calibration procedures to ensure accurate coordinate mapping. |
|
Pre-aligner Failure |
Analysis & Solution: The pre-aligner is used for wafer notch positioning. Failure often manifests as positioning offset or failure to sense. 1. Cleaning & Lubrication: Clean the mechanical probes or optical sensing area of the pre-aligner, and check if the air path (if pneumatic) is clear. 2. Sensor Check: Check if photoelectric switches or Hall sensors are loose, damaged, or obscured by dust. |
IV. Electrical Control: Frequent RF Match Tuning, Failure of Legacy I/O Boards
|
Pain Point |
Root Cause Analysis and Solutions |
|---|---|
|
Frequent RF Match Tuning |
Analysis & Solution: The RF Match network is responsible for impedance matching between the RF power supply and the chamber. Frequent tuning indicates system instability, often caused by shifting plasma impedance. 1. Check Plasma State: Confirm if target poisoning has occurred, if gas ratios are correct, as abnormal plasma causes drastic impedance changes. 2. Hardware Aging: Inspect internal components of the Match Box (capacitors, inductors, relays) for oxidation or burn marks. 3. Regular Calibration: Perform annual calibration of the matching unit to ensure its tuning algorithm and hardware response are normal. |
|
Failure of Legacy I/O Boards |
Analysis & Solution: Legacy boards typically face issues like component aging or driver incompatibility. 1. Diagnostic Codes: Check the specific I/O address in the equipment error log to locate the faulty channel. 2. Firmware/Software Upgrade: If the error is software-related, try updating the board's driver or firmware. 3. Board Replacement or Repair: For physical damage (e.g., swollen capacitors, burnt chips), purchase compatible refurbished boards for replacement or seek repair from a professional organization. |
Send Inquiry